Workflow Forms are utilized to collect data about a call based on what the user inputs through the Presence module. To set up the CRM Module for use with your Workflow Forms in the Presence module follow the steps listed below.
Navigate to the Presence module and decide where in your dashboard you would like your CRM to live. Once you have selected the location, click the button.
Navigate to the Customer Management tab. Under CRM, click the button.
You will be prompted for the following fields:
- Name: The name of this CRM widget. This name is used to identify which CRM window to open when using the Open CRM button in My Stream.
- Open: Specifies when to open the specified URL.
- On Demand: This will be available from the My Stream Widget using the
 icon.
icon. - Always Ring: Opens when you have an incoming ringing call.
- Answer: Opens when you answer an incoming call.
- Open on calls from internal extensions: When checked the specified URL will open on calls from internal extensions.
- Open URL in new window: When checked the specified URL will open in a new browser pop-up window instead of inside the widget. This can be used for web pages that do now allow themselves to be embedded in iframes.
 icon.
icon.- URL: The URL to set up your Workflow Form tool within the widget, the URL to input is similar to https://testaccount.kerauno.net/#/pages/disposition?frame=true where https://testaccount.kerauno.net would be your Kerauno URL.
Once it is all set up, when looking at the CRM Widget with no active call, you should see something similar to Figure 01 below:
 Figure 01: CRM (Workflow Form A)
| NOTE: | Based on your selection in the Open section when setting up your CRM Widget, this may or may not be visible without further action from the user. |
When a call is active and there is no Workflow Form associated with the Call Flow, you should see a screen similar to Figure 02 below:
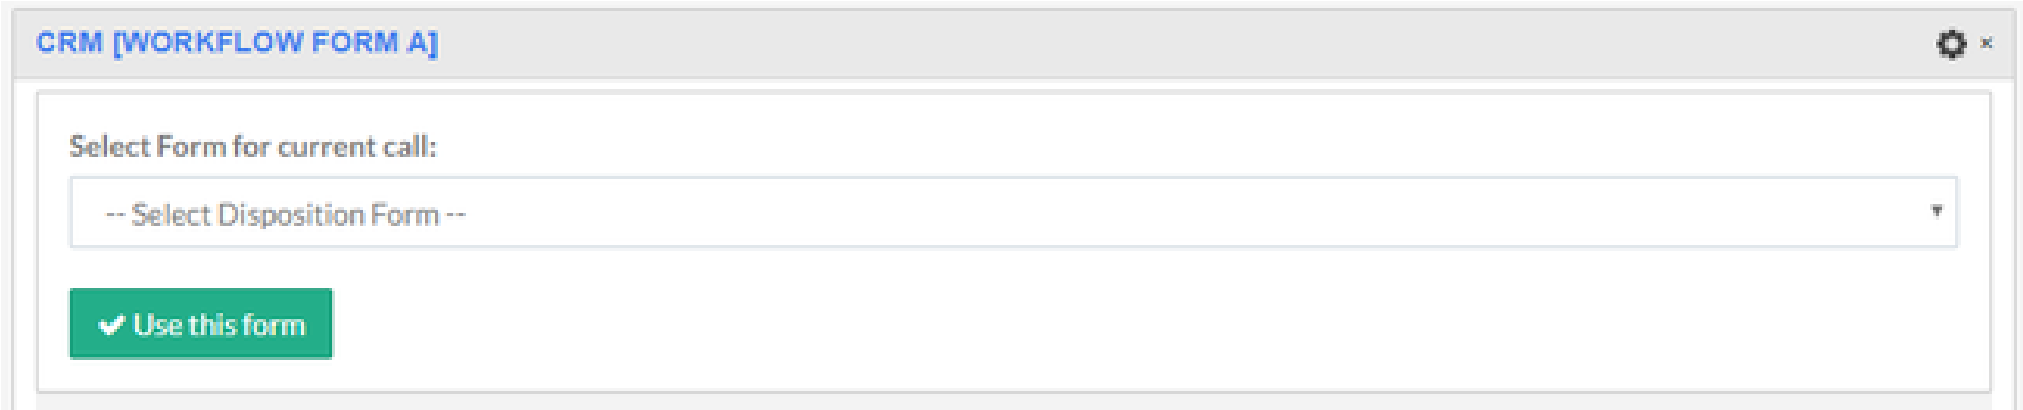 Figure 02: No Workflow Form Associated
| NOTE: | Based on your selection in the Open section when setting up your CRM Widget, this may or may not be visible without further action from the user. This screen will not be available if a specific Workflow Form is selected in the Call Flow Tool and the call is following that specific Call Flow. |
After a Workflow Form has been selected (or is auto-populated based on a Call Flow), you should see your active Workflow Form in the CRM Widget.
The user will then be able to input data into the Workflow Form. This data is submitted when the user presses the button or after the call has ended and another call has been accepted. The data input is available for analytics in the Reporting > Workflow Forms.
- When the data has successfully been submitted, you will see a confirmation message at the top of the CRM Widget that looks similar to Figure 03.
 Figure 03: Data Successfully Submitted

Congrats! You now have a completed Workflow Form saved in your Kerauno Workflow Platform.
Dragging & Dropping Workflow Forms in the Call Flow
Navigate to the desired Call Flow and find the Workflow Forms drop-down. Once the drop-down is selected, your list may be empty if you do not have any Workflow Forms saved or it may look similar to Figure 04 below.
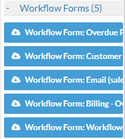 Figure 04: Workflow Forms List
Drag the desired Workflow Form into the Call Flow and drop it where desired.
| NOTE: | Anything following the object that the Workflow Form is dropped into will be removed. |
Setting a Workflow Form directly in a Call Flow will automatically open the Workflow Form when you are in the CRM Widget in the Presence module.
